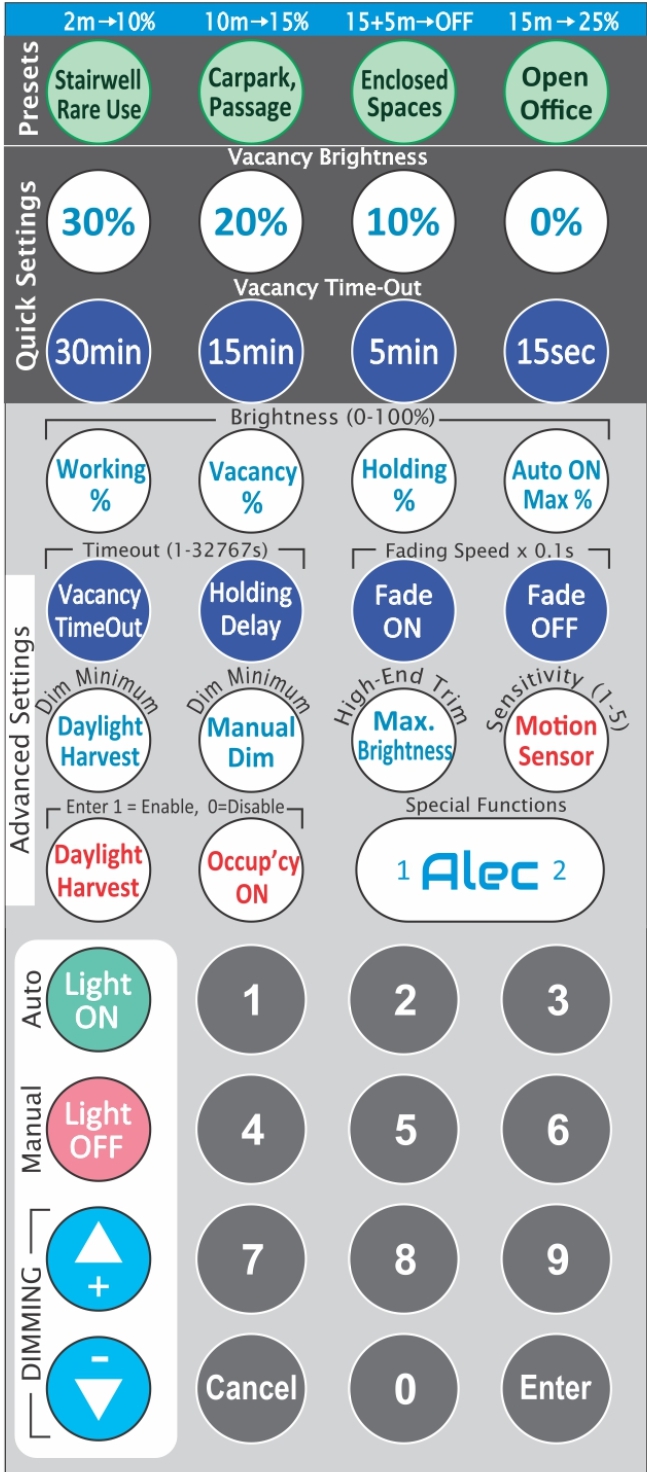
ARC-044: 44-Key Installer Remote User Guide
Most of the parameters that can be configured using the ALEC Mobile App via the USB port can also
be changed using special keys in this IR remote controller. However, unlike the ALEC Mobile App that
can read back all the settings from the controller, make changes and write back the new settings,
the IR remote setup is a one-way configuration process. You can still get visual feedback during configuration
process by observing the green LED status indicator (normally used as sensing LED) on the LC2 controller as shown below:
|
 The ARC-044 is a specialized infrared remote control for an installer or lighting commissioner
to remotely configure an LC2 lighting controller after it has been installed on the ceiling.
The ARC-044 is a specialized infrared remote control for an installer or lighting commissioner
to remotely configure an LC2 lighting controller after it has been installed on the ceiling.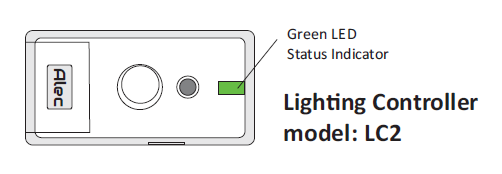
CONTROL BUTTONS
|
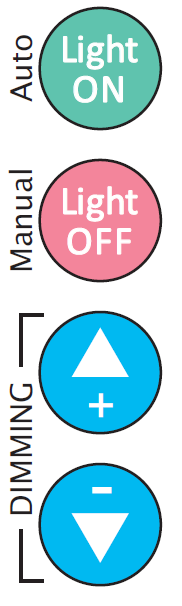
The four buttons on the lower left corner of the ARC-044 are used for controlling the light.
Pressing the "Light OFF" button allows you to manually turn OFF the light and put the LC2 in "manual
override" mode for up to 8 hours. During the manual override period, the light will not respond to
occupancy sensing or daylight conditions. The green LED status indicator will blink once every second while the controller is
in manual override mode. Press the "Light ON" button will turn ON the light. It also cancels the manual override mode
and put the lighting controller back in auto mode. The green LED status indicator will resume its
normal function as an indicator for sensing occupant. You can use the two DIMMING buttons to visually set the "Working Brightness" of the light. Each press of
the button increases or decreases the light level by 5%. If you press and hold the DIM+ button then the light
will gradually increase to the Maximum Brightness setting. If you press and hold the DIM- button, the light will
decrease gradually to the manual minimum brightness setting. When you have found your comfortable Working
Brightness setting release the button and the new setting will be memorized by the controller.
The Working Brightness is the light level that the fixture will be brightened to when it senses the
occupants. If daylight harvesting is enabled (default), the lighting controller will also remembers
the actual brightness (using its integrated lux sensor) when the Working Brightness setting is changed. When a light is already in dimmed or OFF state after vacancy time-out, then when LC2 senses the occupant
it will initially brighten the light to the preset Working Brightness level. Three seconds after it has
reached the preset Working Brightness, the daylight harvesting control will take effect and continuously compare
the actual brightness of the space against the memorized brightness. If the space is brighter than it remembers
(most likely due to daylight) the lighting controller will automatically dim the artificial light in order to
maintain memorized brightness for the space. Likewise when the space starts to become darker LC2 will brighten
the artificial light so that occupant will still get the same desired brightness Note: You can also set the precise working brightness level to 1% resolution using the "Working %" button in the "Advanced Settings" section of the IR remote. |
PRESET PROFILES
The top row of buttons set up the LC2 controller to use pre-set profiles similar to what you can define using the ALEC mobile app. It is one-button commissioning for the most common application types. By default these preset profiles use the following settings. You can make further changes (such as changing the vacancy light level, time-out etc using the quick settings or the advanced settings buttons) after selecting the preset profile.
Note: The working brightness, daylight and occupancy enable/disable settings are not changed by pressing the Preset keys.
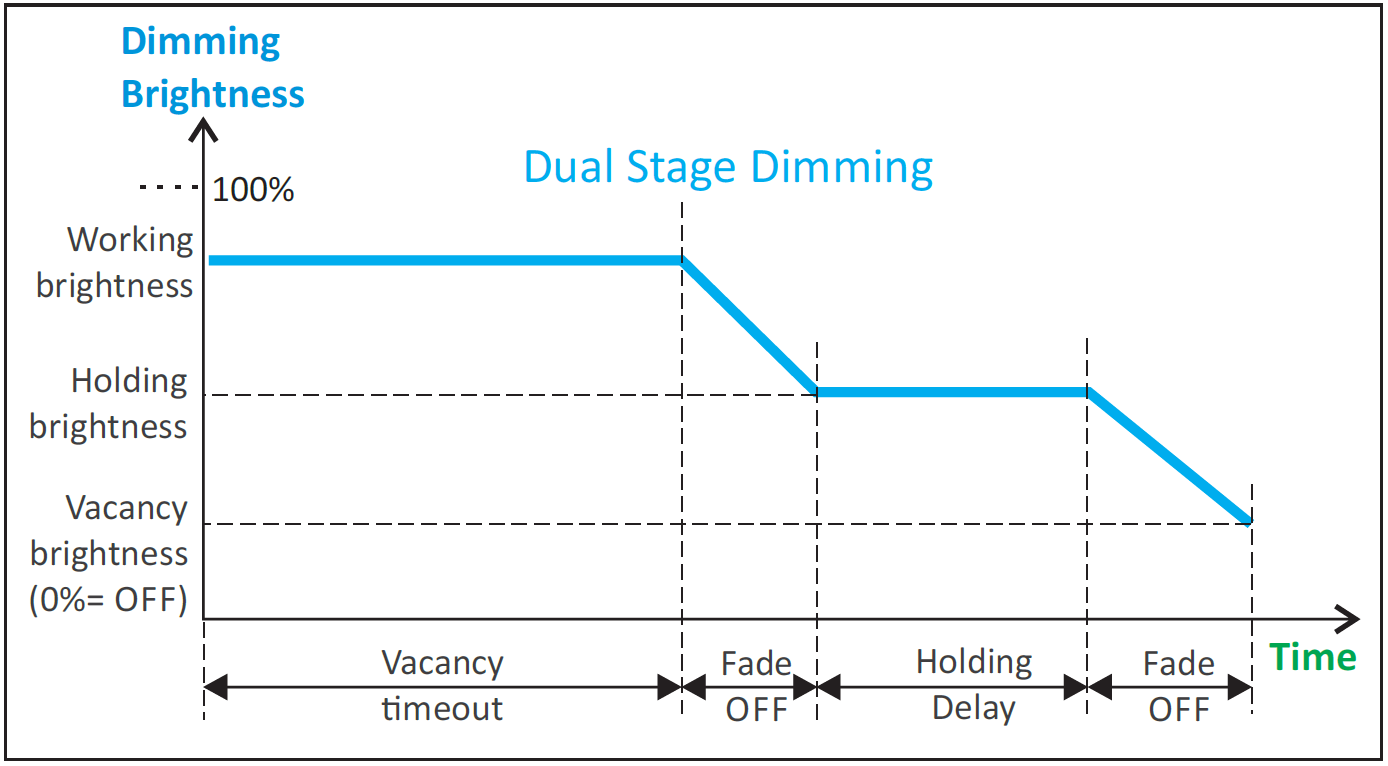
| Preset Profiles | Vacancy Timeout | Holding Brightness | Holding Delay |
Vacancy Brightness | Fade ON |
Fade OFF |
| Stairwell | 2 min | 25% | 15s | 10% | 1.5s | 5.0s |
| Carpark | 10 min | 25% | 2min | 15% | 1.5s | 5.0s |
| Enclosed Space | 15 min | 25% | 5min | 0% | 1.5s | 5.0s |
| Open Office | 15 min | 50% | 5min | 25% | 5.0s | 10.0s |
QUICK SETTINGS
The 2nd and 3rd rows provides the some of the commonly used settings during commissioning. Simply press the corresponding button to select the vacancy time-out period and the brightness that you want the light to be dimmed to after the vacancy time-out and holding delay time-out.
Note: If you set the vacancy brightness (including 0%, which means to turn off the light)
to be lower than the holding brightness , the light will first be dimmed to the “Holding
brightness”. It will remain at the “Holding brightness” for for a time period defined by the
“Holding Delay” before finally reaching the “Vacancy brightness”.
ADVANCED SETTINGS:
We recommend turning OFF the light using the OFF button before setting a parameter. Doing so gives you the confidence that the changes you are making are for a specific light and the green LED indicator on the lighting controller is also easier to observe when the main light is OFF.
1) Press a button (e.g. "Vacancy %")
2) The green LED stays fully bright for up to 15 seconds. Time-out if no entry.
3) Now enter the number using the numeric keypad (e.g. press 2 and then press 5 for 25%)
4) The green LED turns OFF for 0.2s when a key is pressed and back ON again.
5) Press Enter key to complete the number entry.
6) If accepted the LED will blink rapidly a few times and it goes back to normal function of indicating occupancy sensed
7) If rejected the green LED will be turned OFF and then it goes back to normal function of indicating occupancy sensed
8) During numeric entry the user can press the “Cancel” button to cancel the entry. The green LED goes OFF and back to normal function.
NOTES:
- The Working brightness can also be set using the DIM+ and DIM- buttons. Each press of the buttons will adjust the brightness by 5%. By continuously holding down a button the user can visually adjust the brightness to their desired level. 3 seconds after the adjustment has stopped the brightness as well as the lux level reading of that moment will be captured and saved inside the controller for use by the Daylight Harvesting control.
- The “Auto ON” brightness sets the maximum brightness the light is allowed to automatically brighten to when turned ON by occupancy sensor. User can press the “ON” button on the remote to get full working brightness. This setting does not affect when the light is first turned ON by light switch, which will always brighten to the full working brighntess.
- "Fade ON" and "Fade OFF" times are set as multiples of 0.1s. E.g. For Fade Off time of 2.5s enters "25". These two timings represent the total time it takes for the light to brighten from 0 to 100% and to dim from 100% to 0%, respectively.
- The
 buttons are special function buttons
reserved for other settings that may be required in future.
buttons are special function buttons
reserved for other settings that may be required in future.
Visual Feedback on Settings
1) When a brightness-related setting (11 in total, including the 4 Quick Setting keys and 7 Advanced Setting keys) is accepted, the light will immediately be set to the keyed in brightness for 2 seconds to show user their selected brightness. Then the light will restart.
2) Any other settings accepted by the controller will result in the light restart from OFF and brighten to the working brightness.
3) Vacancy TimeOut, Holding Delay and FadeOFF time do not have immediate feedback and user has to wait for the time-out to actually occur to verify. FadeON time visual feedback is immediate when the light restarts.
4) Daylight Harvest or Occupancy ON Enable/Disable Settings: Enter 0 to disable. 1 to Enable. When enabled, the green LED will fade from OFF to full brightness and then fade OFF again, indicating the function has been enabled. When disabled, the green LED will simply blink rapidly several times (just as with other settings) to indicate that the function has been disabled. Additional feature for Occupancy ON Enable: enter value >= 10 to set the daylight sensor thresholds for occupancy event to turn ON the light. 10 means daylight sensor must see < 1.0 lux for Occupancy sensor to turn on the light when sensing occupant.
5) Motion Sensor Sensitivity. 5 is most sensitive and 1 is least sensitive. It is probably more useful for microwave sensor (in future). But for LC2 it just sets the number of times the sensor need to be triggered to turn ON the light.
6) The user can press the OFF button to manually turn OFF the light. The light will enter “manual” mode, during which the occupancy sensor will not work to turn ON the light even if Occ ON is enabled. LED indicator blinks to mid brightness every second to indicate that it is in manual mode. Manual mode expires in 8 hours by default or when the main power switch to the light is turn OFF. The Forced Manual duration can be changed from the USB port via the app. This feature is useful for example the user wishes to turn OFF the light for projector or just to take a rest without the occupancy sensor turning ON the light automatically. The user can press the “ON” button to manually turn ON the light and the manual mode will be cancelled. The vacancy sensor will work to DIM the light after vacancy time out
Initial Vacancy Time-Out
There are many applications (such as warehouses, department stores and open offices) where a time-clock is used to power up the entire premises at the beginning of the day. As a result, all the lights will be brightened to the full brightness even though the space is not yet occupied.
To reduce wasting energy during this time, LC2 implements an initial vacancy time-out of 15 seconds when it is first powered up. If the space is unoccupied the light will dim down to the holding brightness after 15 seconds and the rest of the dual stage dimming settings will prevail.
If an occupant is detected during the first 15 seconds LC2 will use the actual vacancy time-out setting to control the light.
If you prefer that an LC2 uses the actual vacancy time-out when it is first powered up, it must be specially configured. Please contact support@aleccontrol.com to find out more.